Updated Aug 5, 2024
Video: How I Resoled (My) Red Wing Boots, A Step-By-Step Guide
This post may contain affiliate links that at no additional cost to you, I may earn a small commission from.

Expert Verified By: Trenton Potter, Cobbler & Footwear Expert
A funny consequence of owning an unreasonably high number of leather boots is that, shockingly, I’ve never had a pair resoled. They don’t get enough wear. Until now!
An enormous benefit of a Goodyear welted boot is the ability to resole them, vastly extending their lifespan, and even though the soles of my Red Wing moc toes had been on their last legs for some time, it wasn’t until I befriended Trenton & Heath of the massively popular YouTube channel that I knew I’d found the right guys to do it.
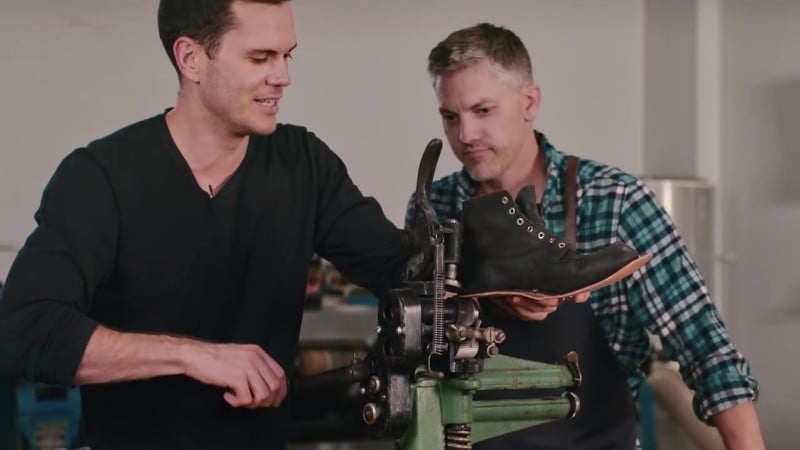
Unlike me, they actually get their hands dirty by recrafting shoes and boots, so when Heath offered showed me how to resole a pair of boots, I grabbed my beloved boots and headed down to Nashville.
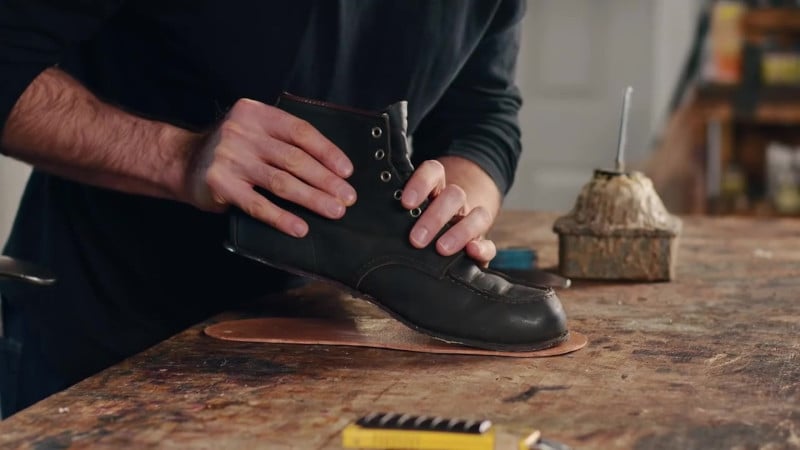
The Boots: My 6-year-old Red Wing Classic Mocs
A bit about my boots: These were the first Goodyear welted boots I ever bought. They are the reason I started my YouTube channel (subscribe here, there are a ton of great boot videos) and this blog — I have an emotional connection to these boots.
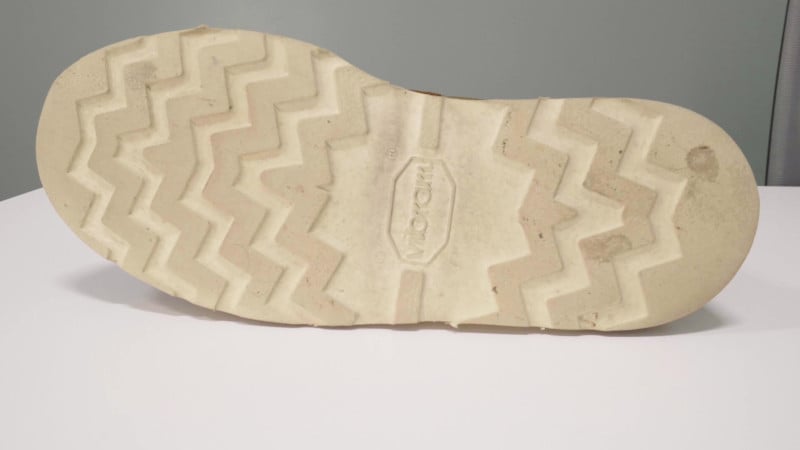
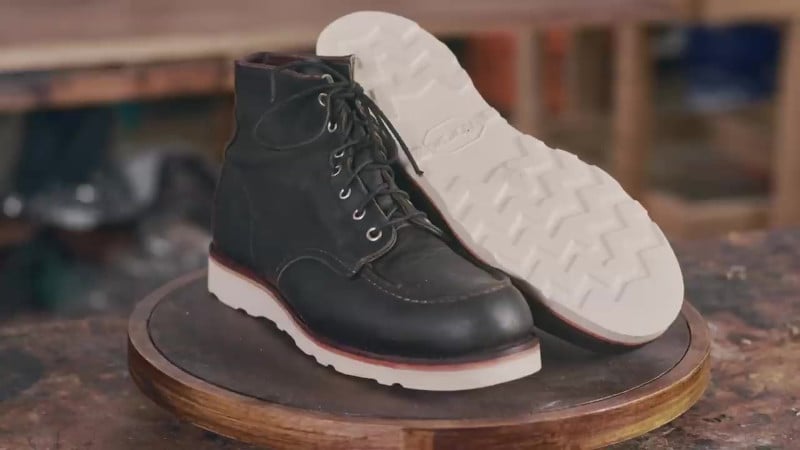
These are the Red Wing 8890, also known as Charcoal Rough & Tough Classic Moc Toes. You can see in the image that they’re pretty ground down; when you live in New York City, you walk everywhere and your footwear gets pretty worn out.

These have a vegetable tanned leather insole, a layer of cork, a rubber midsole, and a “Traction Tred” crepe rubber wedge sole.
For the resole, I’m going to change a few things and customize these a bit: we’re replacing Red Wing’s sole with a Vibram branded 4014 Christy Wedge sole. I’m going to replace the stock rubber midsole with full leather midsole as well, and we’re replacing the old cork with new. Lastly, of course, we’re changing out the thread in the welt — I’ve decided to go with red.
How to Resole Red Wing Boots
I was lucky enough to get hands on with this process, and it was a cool experience being able to give my beloved boots a second life. This reinforced my belief that buying a good pair of boots is worth the extra investment and it also gave a much deeper insight into the passion that companies like Red Wing and cobblers like Trenton and Heath put into their craft.
I’m going to take you through the process step by step, starting with cutting up the boots all the way to the final product.
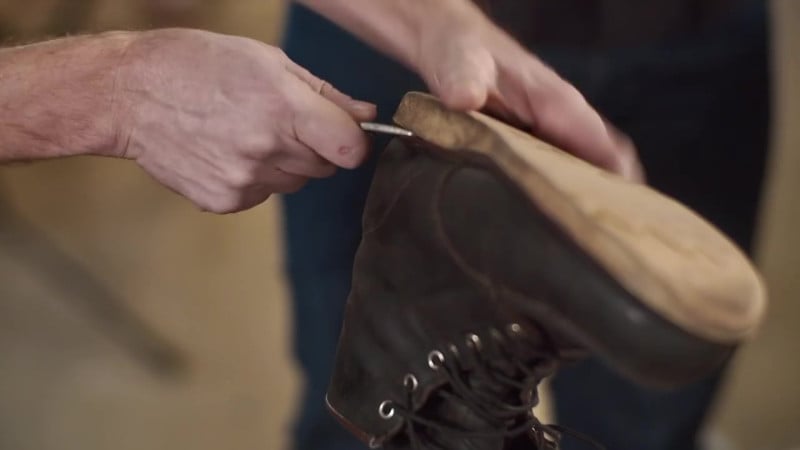
Step 1: Remove the Old Soles
First, we have to cut open the boots. You take a sharp knife and place the blade between the rubber midsole and the outsole. After you unseal the glue that holds outsole to the midsole, you can see that the stitches are doing their job and holding the midsole in place. Next, you cut the stitching with a box knife.

Now the sole is ready to be pulled off. There’s still a bit of glue, so Heath used a tool to grip the outsole and provide some leverage as he peeled the outsole from the rubber midsole.
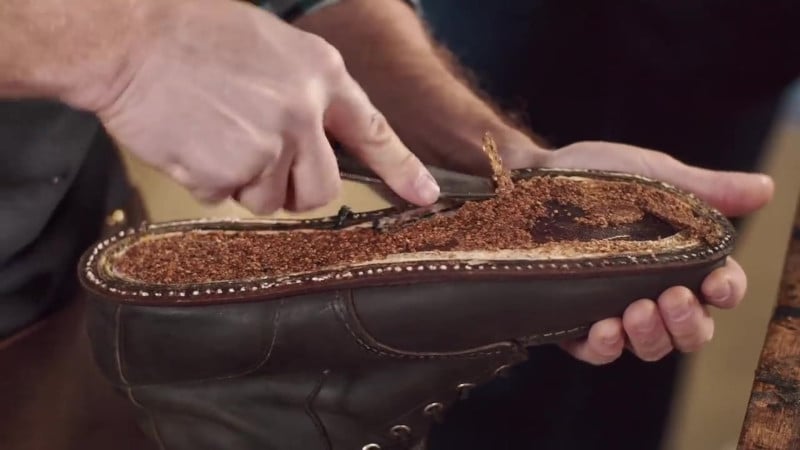
Step 2: Remove the Old Cork Filler
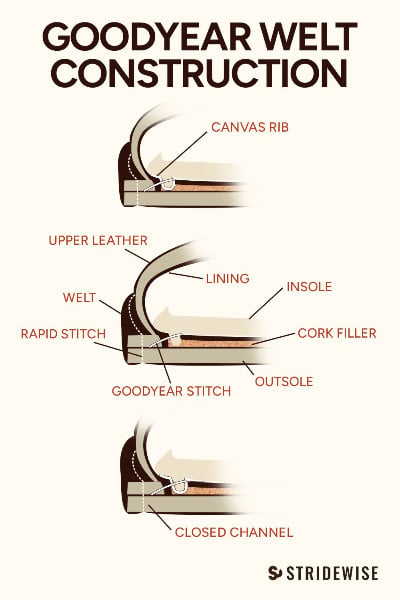
Then, we’re going to pull out all the old cork filling and replace it with fresh cork. The filling is made of cork and glue and is intended to provide some shock absorption and enhance comfort. You can also see a canvas rib attached to the bottom of the insole leather with glue (this is known as gemming). This gemming was stitched to the upper and welt.
[Read More: Goodyear Welt Vs. Blake Stitch Vs. Cement — Which is Best?]
You can also see the leather insole peeking through the cork. This is the same part that your foot is on top of when you slip them on. When we mention veg tan insoles, this is the part we’re talking about. It’s a strong and very tough material and holds up well against the friction from your foot and flexing when you walk.
But we’re not changing the insole; we’re adding a new layer of cork underneath it.

To remove the rest of cork, you spray a glue thinner to dissolve the glue mixed in with the cork in order to loosen it up. After you scrape off the cork filler, you can see the hollow cavity, and that needs to be filled with fresh cork.
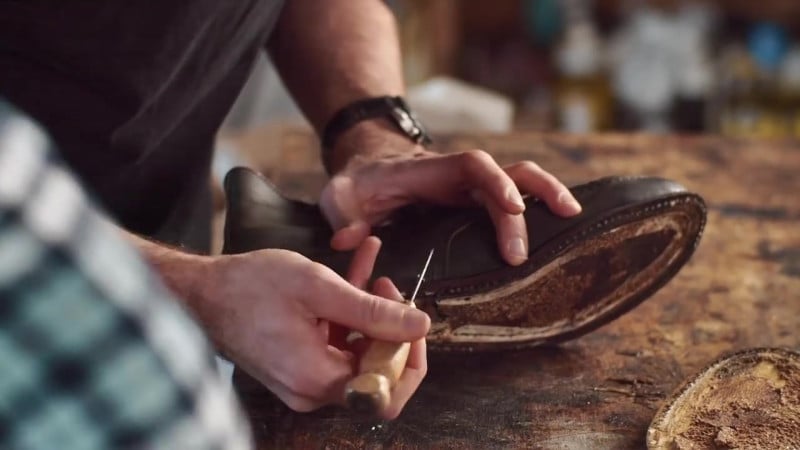
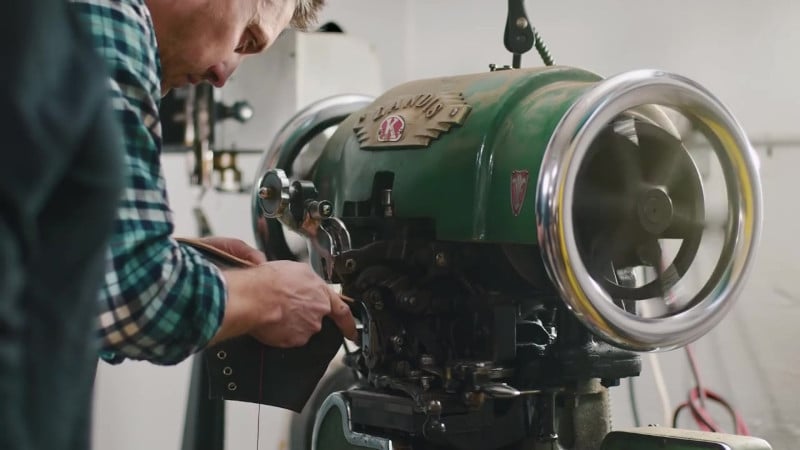
Step 3: Remove the old Stitching
We still have these the old stitches in the welt, so we have to pull all those out. If you’re wondering where the shank is on this Red Wing Moc Toe, they don’t have one, the other popular Red Wing boots do — the Iron Ranger and the Blacksmith do but because the sole is flat, a shank hasn’t been added to help with stability.
Removing the stitches is pretty tedious work. You need a sewing awl and you want to make sure you have an experienced cobbler because when you remove the stitching it’s easy to poke new holes in the welt, which will drastically decrease its lifespan. So you want to pull all the stitches: use the awl to pull up some of the thread and then just grab those stitches with pliers and pick them out.
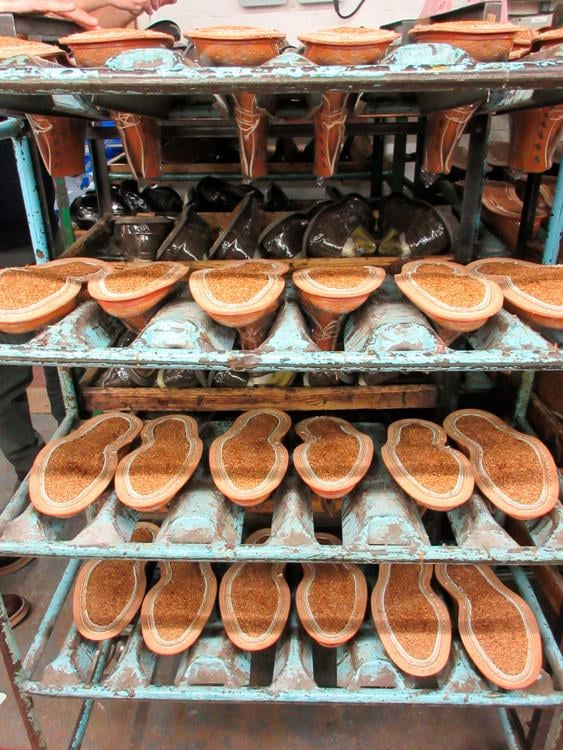
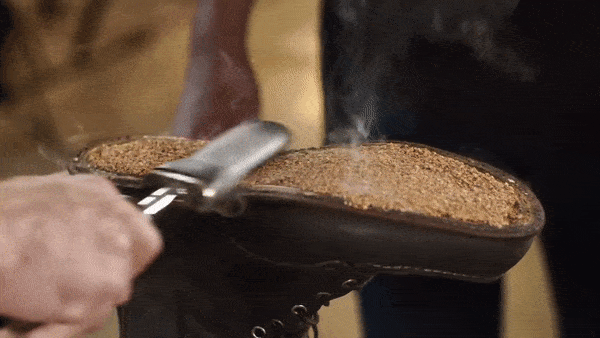
Step 4: Add Cork Filler
Now we need to replace the old, compressed cork with fresh cork. After you do this, you’ll have to wait for the cork to cool and harden. You don’t want to put a new sole on when it’s still soggy because it’ll compress when you put your foot into it and won’t provide a solid base.
This cork layer is very important for heritage footwear. It’s what came before materials like EVA and Poron that you find in some boots nowadays. I’ve got a pair of Trickers shoes, and Trickers is very proud of having the same cork formulation for the past 200 years. Hot cork is more common in mass-produced boots. A lot of brands have big vats and once they’ve got the boot in production, they’ll squirt hot cork into the gap and they’ll iron out the cork to smooth it down.
The fresh cork is going to feel different when you first wear these because it’s not as compressed as the old cork, That’s one reason that boot makers historically use cork: You will have to “re-break in” the sole to an extent.
[Review: Is Tricker’s Stow Boot the Best Calfskin Boot?]
That’s basically what we’re doing to my Red Wings, but if you get a bespoke pair, a lot of times they’re going to use sheet cork that’s cut by hand. The hot cork costs a little bit more and it takes a little bit longer to employ because it has to dry. The sheet cork is more traditional, but one isn’t really better than the other: they’re both cork and at the end of the day serve the same purpose.
You want to really press it into the gap and make sure you have a nice, even density of cork filling the cavity. The last step with the cork is to smooth it and heat it up with an electrical tool that looks a bit like a flat curling iron. Then you set your boots aside and let them dry.
Step 5: Glue the New Sole
I’m replacing the stock sole with Vibram’s 4014 Christy Wedge sole, which is a bit harder than the stock Red Wing sole, even though Red Wing’s sole is produced by Vibram as well.
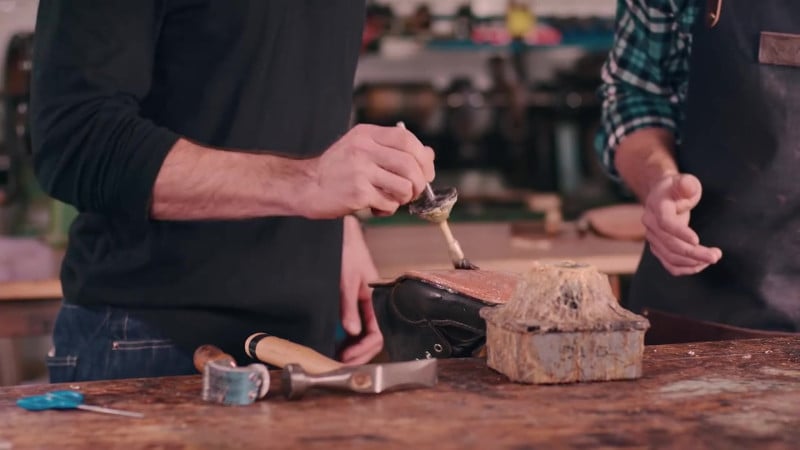
The first step is to ‘scour,’ or rough up the sole with a hand roughing tool. You take the tool, which has sharp “hairs” on it, and scrape the rubber where you will apply the glue to the sole. The rubber needs to be scuffed up so that the glue can adhere to the surface of the rubber. If it’s too smooth, there aren’t any tiny frays and divots for the glue to adhere to.
You’ll notice that there are a bunch of holes in the sole. Heath didn’t know exactly why that’s the case: it could be to make the shoes lighter, or it could be to get them out of the injection mold during the manufacturing process.
The next thing you do with the soles is liberally glue the rough side of the sole. The last step is to put them on a drying rack and wait.
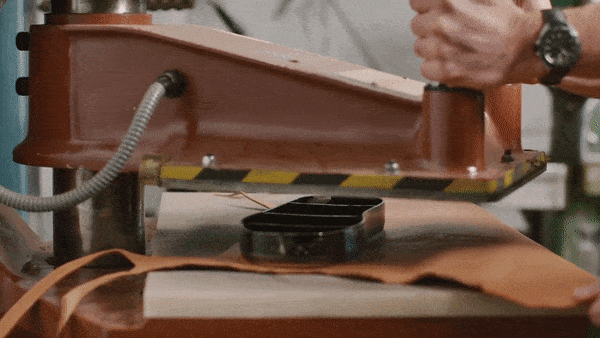
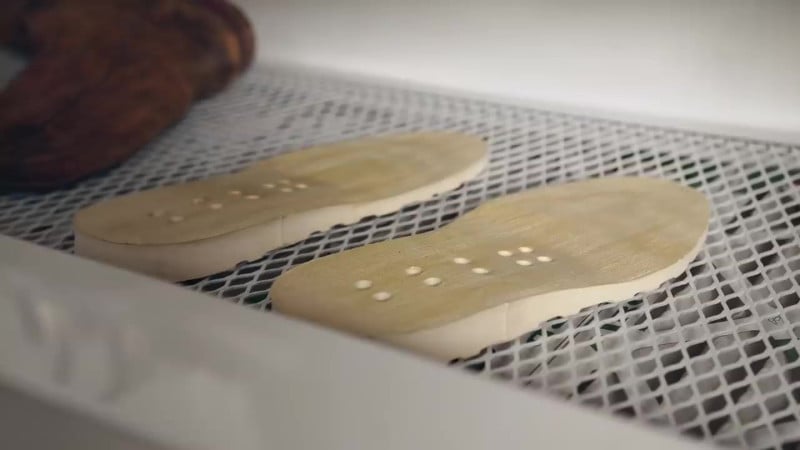
Step 6: Cut the Leather Midsole
Another upgrade I’m doing to my boots is adding a leather midsole. All Red Wing Boots use a rubber midsole, but I wanted to make these more durable, so I’m going with a leather midsole.
Heath uses a swing arm press that exerts downward force onto a mould that presses into a roll of veg tanned leather. This is easier than hand cutting. Basically, you swing a large press and use a pre-shaped cutter to cut out a piece of foot shaped leather. This is going to be the new midsole.
[Related: The 8 Best Vegetable Tanned Boots You Can Buy]
Step 7: Attach the Leather Midsole
Now we need to put glue on the leather midsole. These have two sides: a rough side and a smooth side. Heath likes to put the glue on the already rough side and adhere that to the cork. Before it’s stitched into place, we rough up the smooth side so that it adheres better to the Vibram outsole. Because it’s a leather midsole, we use a special type of contact cement that’s formulated for leather.
Once that’s finished, we’ll let the glue midsole dry separately and add more glue to the cork filling on the bottom of the boot. (Make sure you get plenty of glue on the welt.) This is a very important step because that’s actually what you’re going to bond to the insole and the outsole.
We are now attaching the leather midsole to the cork. This first part is pretty straightforward: you just place the boot over the midsole and press down. The next step requires a device called a shoe stand, which reminds me of a medieval anvil but more foot shaped. Heath used a hammer here, with the goal being to hammer out any air bubbles or uneven bits between the cork filler, the welt, and the leather midsole.
We then use another tool called a welt roller that crimps the welt nice and tight. We want to push the welt down onto the midsole and put pressure on the welt, so we’re helping to seal them up.
The last step in attaching the midsole is to trim the excess leather off the perimeter. The mid sole leather is pretty soft, you can just hand cut it by guiding the blade it with your thumb.
Step 8: Add the Goodyear Welt Stitching
One of the more exciting parts of this process for me is seeing welting and watching Heath use a Goodyear welt machine. The machine is essentially a really beefy sewing machine that can punch through all of these durable materials we use.
At the last second, I made the perhaps questionable decision to use red thread on these, so I now have gray boots with red thread running around the welt. I wish I had some really good backstories to share for this choice like the red represents Red Wing and heritage, but I kind of just flipped the coin in my head. These are my most beloved boots. I may have ruined them, or they might look pretty cool.
Step 9: Attach the Outsole to the Midsole
Here, we applied glue to the outsoles and let that dry. If you’ve only ever used everyday adhesives like super glue and Elmer’s glue, you might be wondering why we need to let the glue dry before we stick things together. This is called dry time: some adhesives need to dry a bit and become tacky before they adhere well to other surfaces. Since we’re attaching leather to rubber, we want the bond to be strong, and the adhesives Heath uses require specific dry times.
Now we apply glue to the roughed up leather midsole, making sure there’s glue all the way to the edges. Again, this adhesive has a specific dry time, and we need to wait for that, but afterward, we need to apply yet another coat of glue and wait for that to dry. There really is a lot of glue and waiting, but this will make everything super strong.
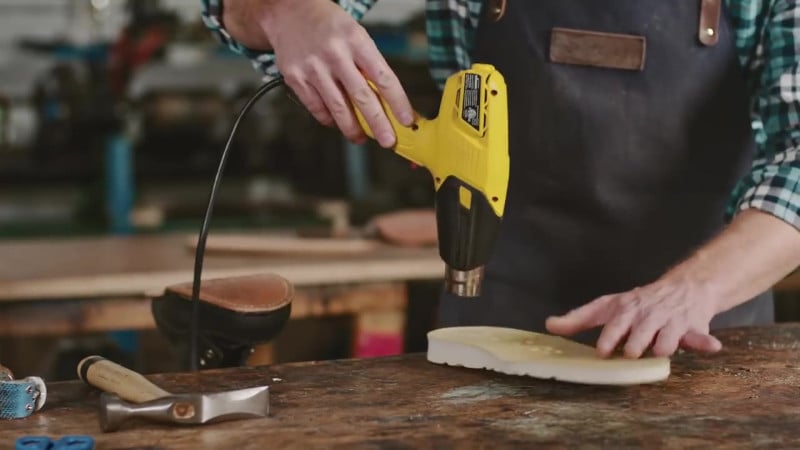
We’ve got our glue on both the midsole and outsole. The last thing we need to do before we attach the outsole is to reactivate that glue. It’s been sitting for a little while, so we blow some hot air in there, and that’ll make it tacky again.
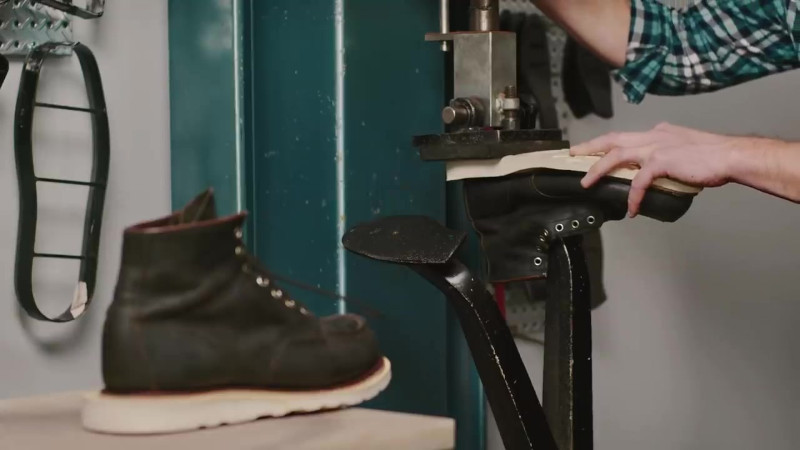
The final process is to press the midsole to the sole. We stick our boot on the shoe stand and hammer the outsole to make sure it’s nice and bonded. To really ensure that we have a good seal, we then move over to the aptly named sole press, which puts about 60-80 PSI of pressure onto the sole to squish it all together.
We then trim off the excess rubber around from the perimeter of the outsole by hand and finally, we sand down the edges of the sole so it’s as smooth as possible.
Wrapping Up
There you are, I have a nice resoled pair of boots. I’m really enjoyed this experience.
I knew a resole would make my soles look new, but this is an upgraded pair of boots: we replaced the rubber midsole with a leather midsole, added new cork, we put on the new wedge sole from Vibram, plus we added a little pop of color with your red thread.
That’s four ways my oldest pair of boots are better than they ever were. Thanks, Heath!